"Device for backing up work or personal work or personal files, but also a Wi-Fi router and, using docker, multimedia media center or collaboration room."
As smart working is well ingrained in our lives, we decided to try the Amber Pro Appliance which combines NAS, router/access point, and server and can be useful for securing our work files and much more...

Computer Idea!
"As smart working is well ingrained in our lives, we decided to try the Amber Pro Appliance which combines NAS, router/access point, and server and can be useful for securing our work files and much more..... "
"What do I find?"
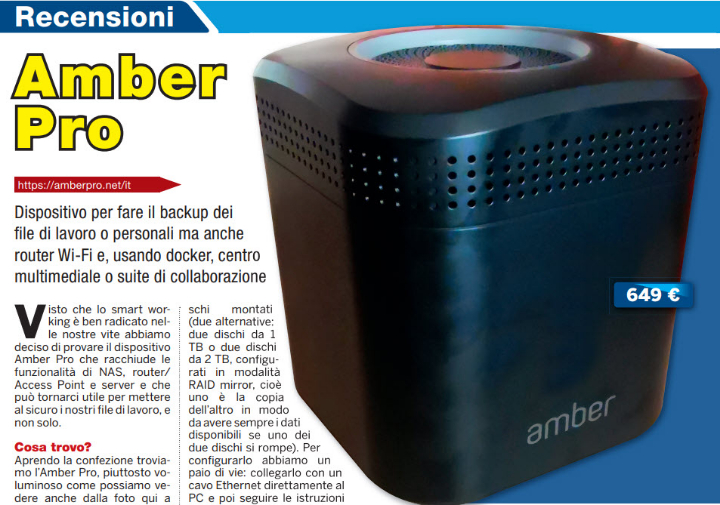
When we opened the package we found the rather bulky Amber Pro as we can see in the image on the right. the external power supply with a "schuko" socket, a Gigabit network cable, and the quick start guide.
The Amber Pro arrives with disks already mounted (two alternatives: two 1 1 TB disks or two 2 TB disks, configured in RAID mirror mode, i.e. one is a copy of the copy of the other so that always have the data available if one of the two disks fails).
To make sure that we have a couple of ways: by connecting it with an Ethernet cable directly to the PC and then following the instructions on the package insert, or install the Amber Manager application on your smartphone and then connect to the device using the built-in wireless Point.
We have chosen this second way, decidedly more convenient, also for the connections subsequent connections, which we have always via Wi-Fi.
Two interfaces
Before starting the configuration you need to power the device, connect a network cable from our home/office router home/office router to the blue Ethernet port on the back of Amber Pro, and press the power button, on the back of the device.
Then start the app: the configuration requires our registration on the manufacturer's website and is quite simple; the time required to complete everything is about ten minutes or so. In the end, the app itself suggests downloading another one, Amber iX, to use for managing local and storage space locally and that on the cloud (the union of the two paces makes this solution a hybrid cloud) directly hybrid cloud) directly from your cell phone. However, we preferred to access the AmberPro web interface using the PC browser.
First, we connected the computer to the Wi-Fi network generated by Amber Pro. Then, always from the PC, we went to the URL https://latticerouter.local and accessed one of the two existing Web interfaces, the one for the management part of the router/Access Point.
The second interface is accessible by clicking on the link present immediately under the Login button of the opened page. And here we find the first critical point: the passwords of the two interfaces are different and there is a risk of confusion.
Router functionality
We have said that Amber Pro works as a router and Access Point. In fact, on the back of the device, in addition to the Ethernet port (which connects to the Internet the device), we find two other Ethernet network ports to connect two computers (or other devices).
From the management web interface of the integrated router we can control all the various parameters: create a Wi-Fi network for guests, enable WPS to let other devices by pressing the WPS button on the back of Amber Pro instead of using the password, enable parental controls to restrict Internet access by our children or colleagues (if we are in a work environment), update the firmware (only the outer part only), open the ports of the firewall, etc.
"By subscribing to a service dynamic DNS service we can access our data remotely"
The disk space
But we find what interests us most in the interface dedicated to storage (Amber OS) and the section called AmberPro.
In Amber OS, a real operating system with icons and windows, we find in order: File Explorer, that is the file manager to manage the files present in the device and the eventual shares; Control Panel, to configure the shared folders, check the status of disks and more; Backup Tool, for backup management from Mac or Windows; Router, which returns us to the interface you saw before; Amber Finder, to find other Amber Pro devices in our network and the AmberPro which we will talk about shortly. As far as backup and file sharing, one of the two strong points of AmberPro, through the interface and Amber iX application for the computer (analogous in some similar to the one for smartphones) it is possible to decide which folders of the computer are to be copied automatically to the disks of Amber Pro (and eventually also on the 2 GB of cloud space included in the offer), for example. There is also a folder (VPHome) that keeps track of all the changes to the existing files, to go back to a previous version in case of problems.
We can also back up the photos in Google Photos (from the app), or use Time Machine if we have a Mac. In short, the options to secure our files are all there, and the interface, with a bit of practice, is simple to use. But let's move on to the second strong point: AmberPro.
In this section, more complex and suitable for more experienced users, you can install with one click virtual machines (called docker/container) that include ready-to-use applications, for example, Nextcloud for the creation of a personal cloud which we talked about a few issues ago.
In short, this and many other applications (Plex, WordPress, Home Assistant, etc.) are effortlessly installable. In addition to those in Amber's store, you can also install others from https://hub.docker.com. This feature (continuously updated) increases the potential of Amber Pro and simplifies a bit the use of docker and containers, which are not exactly easy.

